
RWI Handwriting Progression
Our Journey to Fluent Writing: Read Write Inc. Handwriting Progression
Writing and reading go hand-in-hand, which is why we follow the structured, multi-stage Read Write Inc handwriting programme to help our children develop a comfortable, fluent, and legible style.
In Stage 1, children focus on correct letter formation using the same visual picture mnemonics and child-friendly catchphrases they learn in phonics (such as "round the apple, down the leaf" for the letter a).
They practice these letters in grouped "families" with shared shapes—like Around, Down, Curly, and Zig-zag letters—initially writing on plain paper before moving to wide lines to master relative size and placement.
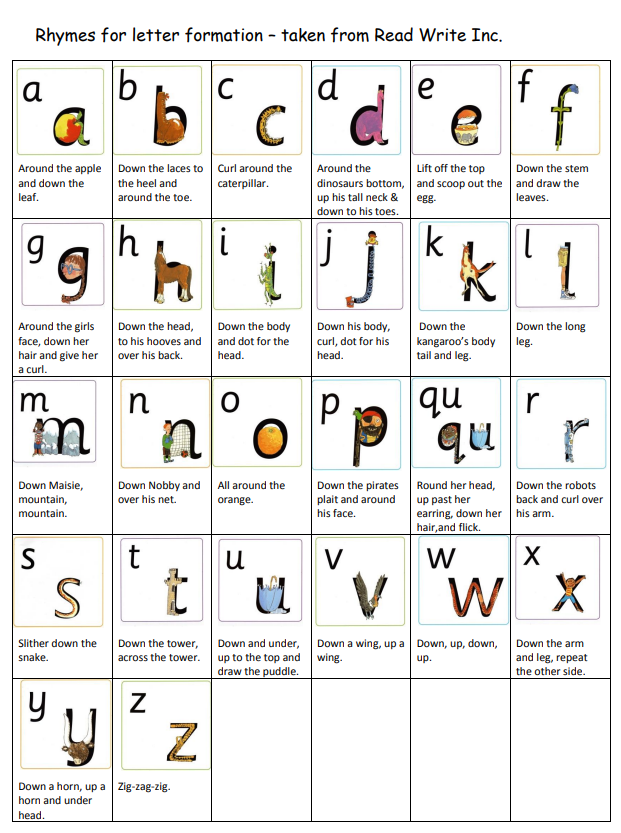
*This is available as a PDF below to print.
As children progress into Stage 2, they learn a flowing, unjoined style where they build an awareness of how letters sit on a baseline. They are introduced to the wonderful, animated world of Letter Village.
Through daily 10-minute video-led sessions, children follow memorable stories and visual character cues to master the relative size and positioning of their letters.
At this stage, they move on to wide-lined books to practice separating letters into distinct structural families—"formation family" consisting of six sisters, two uncles, and two pets.
By focusing on these engaging visual guides and correct posture, Stage 2 ensures our children develop the precise letter orientation and spacing needed to naturally flow into a joined-up cursive script in the next stage.
Visual Visualisations: The "Sponge Cake" Guidelines
Letter placement is taught using the Sponge Cake Format.
| Layer | Letter Type | Examples | How to Picture It |
|---|---|---|---|
| Top Sponge Layer | Tall letters (Ascenders) | b, d, h, k, l, t | Reaches up into the top "icing" layer of the cake. |
| Jam Layer | Short letters (Body) | a, c, e, i, m, n, o, r, s, u, v, w, x, z | Sits perfectly inside the middle "jam" layer. |
| Bottom sponge Layer | Hanging letters (Descenders) | g, j, p, q, y | Dips below the line into the bottom layer. |
Stage 3 handwriting takes children back to the Letter Village to begin the exciting transition into joining their letters.
Typically taught in Year 2 and above, Stage 3 is introduced once children are secure, automatic, and consistent with the letter sizing and formations learnt in Stage 2.
The Two Main Joins
In the Letter Village, children learn that nearly all letters connect using just two basic types of joins.
The Hill Join (Diagonal Join)
The Hill Join is a diagonal stroke that starts from the bottom line and goes up like a hill to meet the next letter.
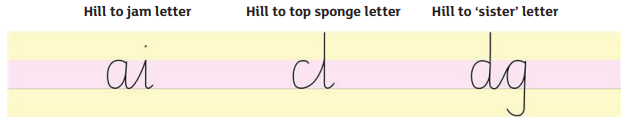
The Bridge Join (Horizontal Join)
The Bridge Join is a straight or slightly curved horizontal stroke that leaves from the top of a letter.
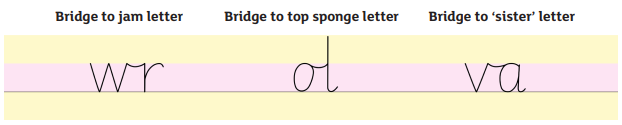
Stage 4 handwriting helps children develop a mature and speedy style.
Handwriting essentials for all stages
Where should children sit to write?
First, we arrange tables and chairs, so all children can clearly see the board/whiteboard. Children practise sitting comfortably at a table to write. This is much more comfortable than sitting cross-legged, hunched over a whiteboard.
We teach children that when we say ‘perfect handwriting position’ they will quickly:
• put two feet on the floor
• push their bottom to the back of their chair
• tuck their chair under the table
• hold their pencil in a tripod grip
• place their other hand on their book or paper, so it doesn’t move around.
Setting Up for Success at Home
- Check the "Perfect Handwriting Position": Before writing, remind your child of the school posture checklist, see above.